Governance, decisions and actions
Home · Governance, decisions and actions

Objective
This page explains, in a simple way, how ProPM Agent moves from:
- a signal detected;
- to a decision;
- then to a governed action;
- possibly subject to approval;
- before it is executed and traced.
This page helps you clearly understand:
- what a governance policy is;
- what
allow,require_approvalanddenymean; - what
observe,draft,proposeandexecutemean; - how to use Actions & approvals step-by-step;
- why an action can be visible but blocked.
Very simple view of the flow
In ProPM Agent, the normal path is:
- a signal grabs attention;
- the team reads it;
- governance decides what each role is allowed to do;
- if an external output is required, an action is created;
- if the project requires it, the action goes into approval;
- the action is then executed or rejected;
- the trace remains visible in activity and the AI Journal.
Part 1 — Understanding signals
A signal is a structured alert that says: “this topic deserves attention.”
Signal examples
A signal can surface:
- a freshness of sources that is insufficient;
- a contradiction between multiple pieces of evidence;
- a project blockage;
- a follow‑up that deserves a notification, a decision or an external action.
What the user usually sees on a signal card
A signal card can display:
- a title;
- a summary;
- an explanation;
- a severity;
- a status;
- a mode;
- a number of evidence or retriggers;
- actions such as Create draft, Snooze 24h or Dismiss depending on the role.
Recommended step‑by‑step to handle a signal
When you open a signal, keep this order:
- read the summary;
- then reread the explanation;
- check the evidence and freshness;
- decide if the topic only needs monitoring, a draft or a real action;
- if an external output becomes necessary, move to Actions & approvals.
Useful signal statuses
| Status | What it means |
|---|---|
open | the topic remains active and still needs attention |
snoozed | the topic is temporarily paused |
dismissed | the topic is removed from the active queue |
resolved | the topic is considered handled |
Useful signal modes
| Mode | Simple reading |
|---|---|
inform | the signal informs, without requiring immediate action |
suggest | the signal suggests a next step |
draft | the signal is already oriented toward a draft or preparation |
request_approval | the signal calls for a governed review or approval |
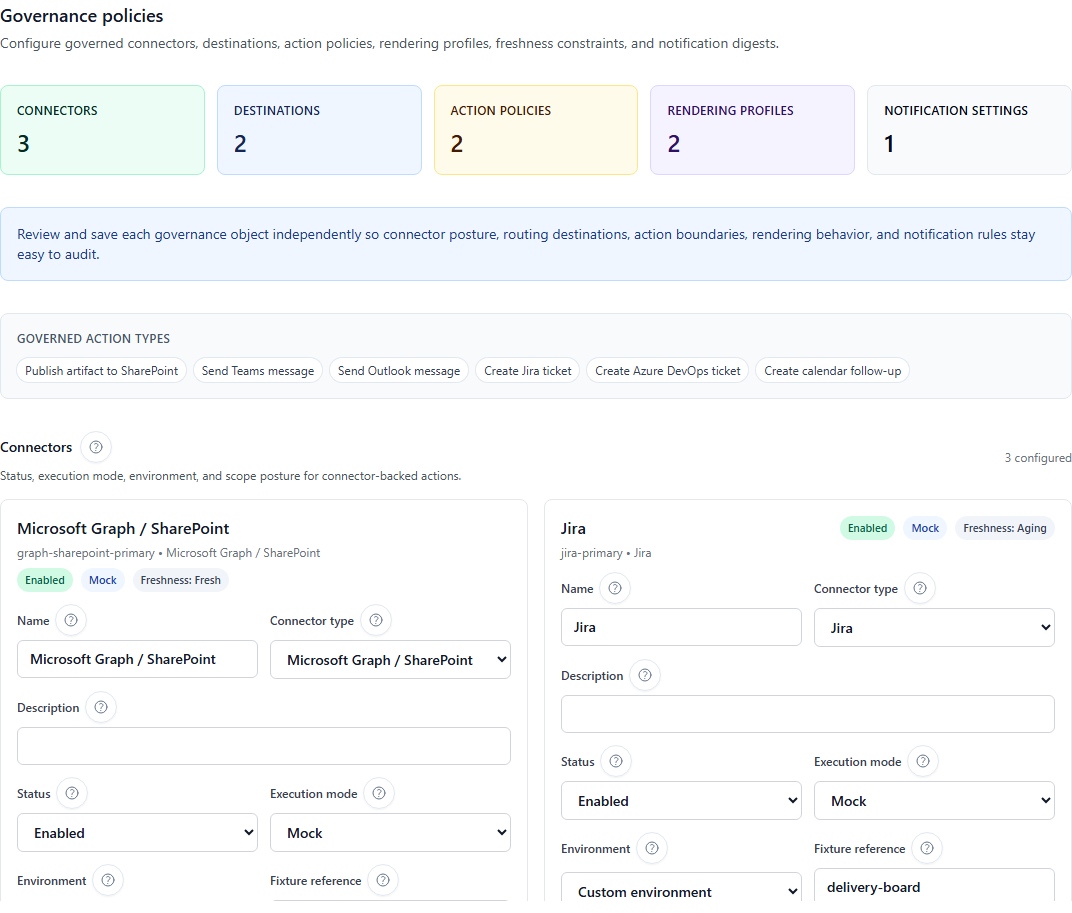
Part 2 — Governance policies
What is a governance policy?
A governance policy is a rule that answers the question:
“Who is allowed to do what, on which connector, and with what level of control?”
In other words, governance prevents an external action from leaving without a clear framework.
What a policy decides
A policy generally answers four questions:
- Who? — which role is concerned;
- On what? — which connector, action type or destination is concerned;
- How far? — simple observation, draft, proposal or execution;
- With what effect? — allowed, allowed with approval, or denied.
Very simple example
A policy might say:
- the Contributor can prepare a Teams draft;
- the Project Manager can propose a SharePoint publication;
- the Project Owner must approve before execution;
- no one else can directly execute that publication.
Understanding levels: observe, draft, propose, execute
The level describes how far a role can go in the flow.
| Level | What the user can do | What they cannot yet do | Simple example |
|---|---|---|---|
observe | see information, follow the topic, consult the queue | create an action or draft | a reader follows signals without preparing an output |
draft | prepare a draft, a text, an intention to act | officially submit the action to the queue | a contributor prepares a Teams message but does not propose it |
propose | submit a real action request in the governed queue | execute the action directly | a project manager proposes a Jira ticket |
execute | launch the real execution if other conditions are met | bypass the policy or imposed approvals | a project owner publishes an artifact to SharePoint |
Very simple reading
observe= I look;draft= I prepare;propose= I officially request;execute= I actually launch.
Understanding effects: allow, require_approval, deny
The effect describes what the platform does when a role reaches this level.
| Effect | What it means | Practical consequence |
|---|---|---|
allow | the action is permitted at this level | the flow can advance without an extra approval step if everything else is ready |
require_approval | the action is possible but must be approved | the approval queue becomes mandatory before execution |
deny | the action is forbidden for this role or scope | the user cannot go further on this flow |
Very simple reading
allow= yes;require_approval= yes, but after human validation;deny= no.
How to read a policy line
Take this reading:
- Role: Project Manager
- Connector: SharePoint publish
- Level:
execute - Effect:
require_approval
This means:
- the Project Manager can go as far as an execution request;
- but the publication does not leave immediately;
- approval is required before the real execution.
Concrete policy examples
| Business case | Role | Recommended level | Recommended effect | Why |
|---|---|---|---|---|
| Publishing a report to SharePoint | Project Manager | execute | require_approval | the output is external and must be reviewed |
| Creating a Jira ticket from a blockage | Project Manager | propose | allow or require_approval | the project can request a ticket without necessarily opening it automatically |
| Low‑risk internal Teams message | Contributor | execute or propose | allow | quick communication with low impact |
| Outlook email to sponsors | Contributor | propose | require_approval | more sensitive and formal communication |
| Webhook to a third‑party tool | Project Owner | execute | require_approval | technical output that must remain tightly controlled |
| Connector not ready or not authorized | all except admin | observe or no usage | deny | we avoid any accidental departure |
Step‑by‑step to configure a governance policy
Follow this simple order.
Step 1 — Open the right surface
From the project Workspace, open Governance policies.
Step 2 — Choose the flow to control
First ask yourself:
- is it a publication;
- a ticket;
- a message;
- a webhook;
- or another external action?
Step 3 — Choose the concerned role
Then define which role can act:
- Contributor;
- Project Manager;
- Project Owner;
- or another role present in your configuration.
Step 4 — Choose the action level
Decide if this role should only:
- observe;
- prepare a draft;
- propose;
- or execute.
Step 5 — Choose the effect
Decide if this level should be:
- allowed directly (
allow); - allowed with approval (
require_approval); - or denied (
deny).
Step 6 — Verify the connector or destination concerned
A good policy is not enough if the connector:
- is not technically ready;
- is not open to the project;
- or does not have the correct artifact destination.
Step 7 — Test with a non‑admin role
The best control is practical:
- log in with a realistic business role;
- open Actions & approvals;
- check what is visible, allowed or blocked;
- adjust the policy if the behavior is not as expected.
Simple rules for good governance configuration
- use
allowonexecuteonly for low‑risk flows; - use
require_approvalwhenever content leaves the project or modifies an external system; - use
denywhen the connector is not ready, not authorized or too sensitive; - keep rules consistent with the roles actually assigned;
- always test a real case before considering the policy ready.
Common mistakes to avoid
| Mistake | Correct reading |
|---|---|
| “I see the connector, so I can use it” | wrong: visibility does not guarantee authorization or technical health |
“propose means the action leaves” | wrong: propose means the request enters the governed queue |
“execute means no control” | wrong: execute can still be combined with require_approval |
“deny means a failure” | wrong: deny is often a normal governance decision |
Part 3 — Actions & approvals
The Actions & approvals screen is used to turn an intention into a real governed action.
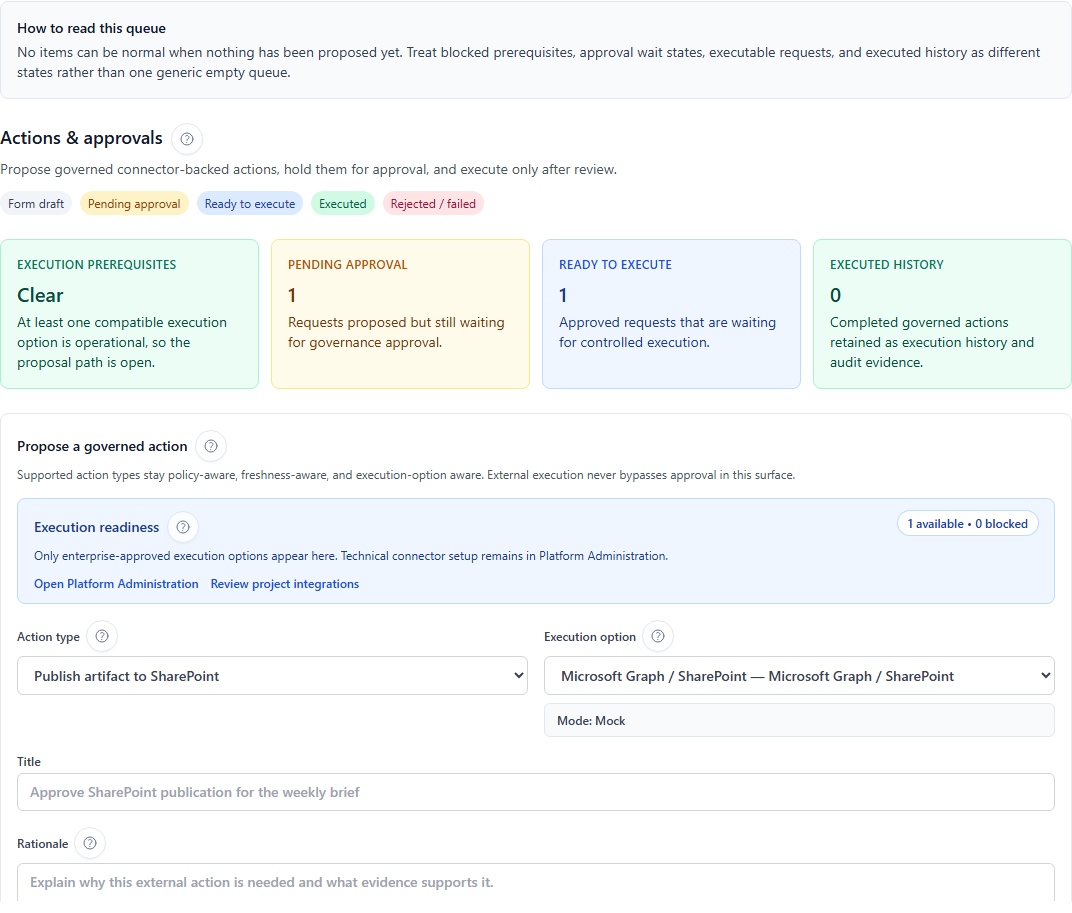
Four canonical readings to keep in mind
In the interface, this surface is easiest to read through four distinct states:
| Canonical reading | What it means |
|---|---|
| Execution prerequisites | compatible execution options may exist, but operational use is blocked or unavailable |
| Pending approval | a governed request was proposed and is still waiting for approval |
| Ready to execute | a request is already approved, but controlled execution is still a separate step |
| Executed history | the action was actually executed and remains visible as audit history |
An approved request is therefore not yet an executed request.
When everything is correctly ready, what should I see?
In a nominal case, the authorized user usually finds:
- at least one relevant action type;
- a compatible healthy execution option;
- a truly active project binding;
- a policy that either allows proposal or routes to approval;
- a queue where requests then move through pending approval, approved, executed or rejected depending on the case.
If one of these links is missing, the screen can look empty, incomplete or purely informational without this necessarily being a failure.
What the user sees in this screen
A user typically finds:
- a Propose a governed action form;
- the choice of action type;
- the choice of execution connector or execution option;
- a readiness summary indicating what is available or blocked;
- fields such as title, rationale, destination, message, ticket description;
- an approval and execution queue with already submitted requests.
Step‑by‑step — create a governed action
Step 1 — Open the screen
In the Workspace, open Actions & approvals.
Step 2 — Choose the action type
First select the business intention. Visible action types include:
- Publish artifact to SharePoint;
- Send Teams message;
- Send Outlook message;
- Create Jira ticket;
- Create Azure DevOps ticket;
- Webhook depending on tenant configuration.
Step 3 — Verify the compatible execution option
The interface then searches for compatible execution options.
Choose an option:
- healthy;
- authorized;
- actually open to your project.
If no healthy option appears, the check usually concerns:
- the connector itself;
- its health status;
- the project binding;
- the policy;
- or your permission.
Step 4 — Read the readiness
The Execution readiness area is to verify you are not just preparing a theoretical action.
In practice:
- available / healthy = option usable;
- blocked by health = connector to check on the platform side;
- blocked by entitlement = legacy wording for a non-plan block; check configuration, binding, policy, permission, approval or health;
- blocked by policy = restrictive project governance;
- blocked by permission = your role is insufficient;
- no visible option = compatible connector missing, missing project binding or option not opened to your role.
Pedagogical reading of a screen that seems empty
When Actions & approvals shows nothing executable, distinguish three cases before concluding that the feature is broken:
- execution-option availability could not be loaded;
- compatible options exist but remain blocked or unhealthy;
- no compatible option is configured yet for the current governed action type.
In all three cases, this is different from a queue that is simply empty because nobody has proposed an action yet.
| What you see | Likely dominant reason | Useful reflex |
|---|---|---|
| no selectable connector | no compatible healthy connector is ready | check Project integrations then Platform Administration |
| visible action but blocked button | permission, policy, or approval required | check the role, then governance |
| visible queue but nothing goes out | the request is still waiting for approval or downstream execution | reread the actual queue status |
| connector present but unusable | insufficient binding, health, configuration, policy or permission | verify the full platform → project → policy chain |
Remember as well that only enterprise-approved execution options appear here. Technical connector preparation stays in Platform Administration, while project exposure is read through Project integrations.
Step 5 — Fill in the title and justification
Then complete:
- a clear title;
- a short but useful justification;
- fields specific to the chosen action type.
The justification should answer two questions:
- Why is this action necessary?
- On what evidence or decisions does it rely?
Step 6 — Complete the business fields
Fields change according to the action type.
| Action type | Frequently expected fields |
|---|---|
| SharePoint publication | title, justification, artifact ID, destination, rendering profile, format |
| Teams message | title, justification, message body |
| Outlook message | title, justification, recipients, subject, message body |
| Jira ticket | title, justification, ticket description, optionally project / board key |
| Azure DevOps ticket | title, justification, description, ticket type per connector |
| Webhook | title, justification and data useful to the target system |
Step 7 — Propose the action
Once fields are filled, submit the request.
At this stage, the action may not yet have left. It can first enter the approval queue.
Step 8 — Review by the approver
If the policy requires require_approval, an approver must review:
- the title;
- the justification;
- the connector used;
- the payload or business detail;
- any related artifact or draft.
Step 9 — Approval, rejection or execution
Depending on the policy and the approver’s role, the request can be:
- approved;
- rejected;
- then executed if everything is ready.
Step 10 — Verify the final trace
After execution, check:
- the action queue;
- project activity;
- the Trace ID if displayed;
- the AI Journal if the flow is reflected there;
- the presence of the artifact, ticket or message in the target tool.
How to read action statuses
| Status | What it means |
|---|---|
draft | the request is still preparatory |
pending approval | approval is awaited before real follow‑up |
approved | the request has been accepted |
executed | the action has actually been launched |
rejected | the request was denied |
failed | the action was launched but did not complete correctly |
cancelled | the request was cancelled |
Step‑by‑step example — publishing an artifact to SharePoint
Situation
The team has reviewed a weekly brief and wants to publish it in SharePoint.
Path
- open Actions & approvals;
- choose Publish artifact to SharePoint;
- select a healthy SharePoint publish option;
- fill in the title of the action;
- add a justification, e.g. “reviewed and approved version for weekly distribution”;
- enter the artifact ID;
- choose the SharePoint destination;
- choose the rendering profile or format if requested;
- propose the action;
- if the policy requires it, wait for approval;
- execute;
- verify that the artifact is indeed published in SharePoint and traced in ProPM Agent.
Step‑by‑step example — create a Jira ticket
Situation
A signal reports a recurring blockage with planning impact.
Path
- open Actions & approvals;
- choose Create Jira ticket;
- select an available Jira connector;
- enter a clear title, e.g. “Supplier blockage on critical batch”;
- complete the ticket description;
- add the justification and useful evidence;
- propose the request;
- let the approver review if the policy requires
require_approval; - execute;
- then verify the external reference or created ticket.
Step‑by‑step example — send a Teams or Outlook message
Situation
The project must inform an internal group or a sponsor that a review is finished.
Teams path
- choose Send Teams message;
- select the authorized Teams connector;
- draft a short, understandable message;
- add the justification if the flow is governed;
- propose, get approved if needed, then execute.
Outlook path
- choose Send Outlook message;
- select the Outlook connector;
- fill in the recipients;
- complete the subject and message body;
- propose, get approved if needed, then execute.
Practical difference
- Teams is well suited for collaborative internal communication;
- Outlook is better for more formal and targeted communication.
Step‑by‑step example — webhook to a third‑party tool
Situation
The company wants to trigger an internal flow to a custom tool.
Path
- choose the action type or flow related to Webhook;
- select a compatible webhook execution option;
- fill in the title and justification;
- complete the data useful to the target system;
- propose the request;
- get approval if the policy requires it;
- execute;
- check the result on the target system and in ProPM Agent audit.
Why an action may be visible but not executable
An action can be visible in the interface but remain blocked if:
- the compatible connector is not healthy;
- the project does not have the correct binding;
- the project policy forbids this level of action;
- your role does not allow proposing or executing;
- an approval is still pending;
- the connector, binding, policy, permission, approval or health state blocks the flow.
What to do if no execution option appears
Follow this order:
- first check Governance policies;
- then check Project integrations;
- open Platform administration;
- finally check configuration, binding, permission and connector health.
Full scenario — from signal to executed action
Simple case
- an
opensignal reports a blockage; - the team reads the summary, explanation and evidence;
- they decide a Jira ticket is needed;
- the policy allows the Project Manager to
proposebut requiresrequire_approval; - the Project Manager creates the request in Actions & approvals;
- the Project Owner approves;
- the action moves to executed;
- the external ticket and internal trace remain aligned.
This scenario summarizes the product logic: see, decide, control, execute, trace.
Best practices
- never confuse draft and real execution;
- use policies to limit sensitive outputs;
- request approval whenever content leaves the project or changes an external system;
- always verify evidence before proposing an action;
- use the AI Journal and the action queue as a common audit reference.