Azure Marketplace Deployment
Home · Azure Marketplace Deployment
Goal
This page details how to deploy ProPM Agent from Azure Marketplace. It explains the two main Azure form screens, the purpose of every visible field, and the checks to complete before selecting Review + create.
The screenshots below show the Create ProPM-50 form. The displayed name can change depending on the selected Marketplace plan, such as ProPM-50, ProPM-100, or another available plan.
Audience
| Profile | Use this page to |
|---|---|
| Azure administrator | Create the Managed Application from Azure Marketplace |
| Tenant administrator | Prepare Entra groups and first administrator access |
| Platform administrator | Understand which settings must be completed after installation |
| Support | Verify the workflow without asking for secrets or internal variables |
| Business user | No, use Getting started instead |
Before You Start
Prepare this information before opening the Marketplace form.
| Information | Why it is required |
|---|---|
| Target Azure subscription | Carries the Marketplace transaction and deployed resources |
| Target resource group | Organizes the customer-side Managed Application object |
| Target Azure region | Defines the primary deployment location |
| Application name | Identifies the ProPM Agent instance in Azure |
| Managed resource group | Receives the internal resources managed by the application |
| Entra Group Object IDs | Grant platform administration access |
| Optional bootstrap users | Help with first access or controlled recovery |
| Initial AI provider | Indicates the AI provider family to prepare for this instance |
| Optional CORS origins | Allow additional web domains when needed |
| VNet CIDR plan | Avoids conflicts with the organization's network |
| Initial password | Must be generated and stored as a secret |
Never copy a password, secret, API key, token, or confidential value into documentation or an unsecured support request.
Deployment Flow
- Open the ProPM Agent offer in Azure Marketplace.
- Select the required Marketplace plan.
- Fill in the Basics tab.
- Select Next.
- Fill in the Application Settings tab.
- Select Review + create.
- Fix any validation errors.
- Start creation.
- Wait for Azure provisioning to finish.
- Open the published URL and complete administration in ProPM Agent.
Screen 1 - Basics
The Basics tab defines the Azure scope of the deployment: subscription, resource group, region, and Azure names for the Managed Application.
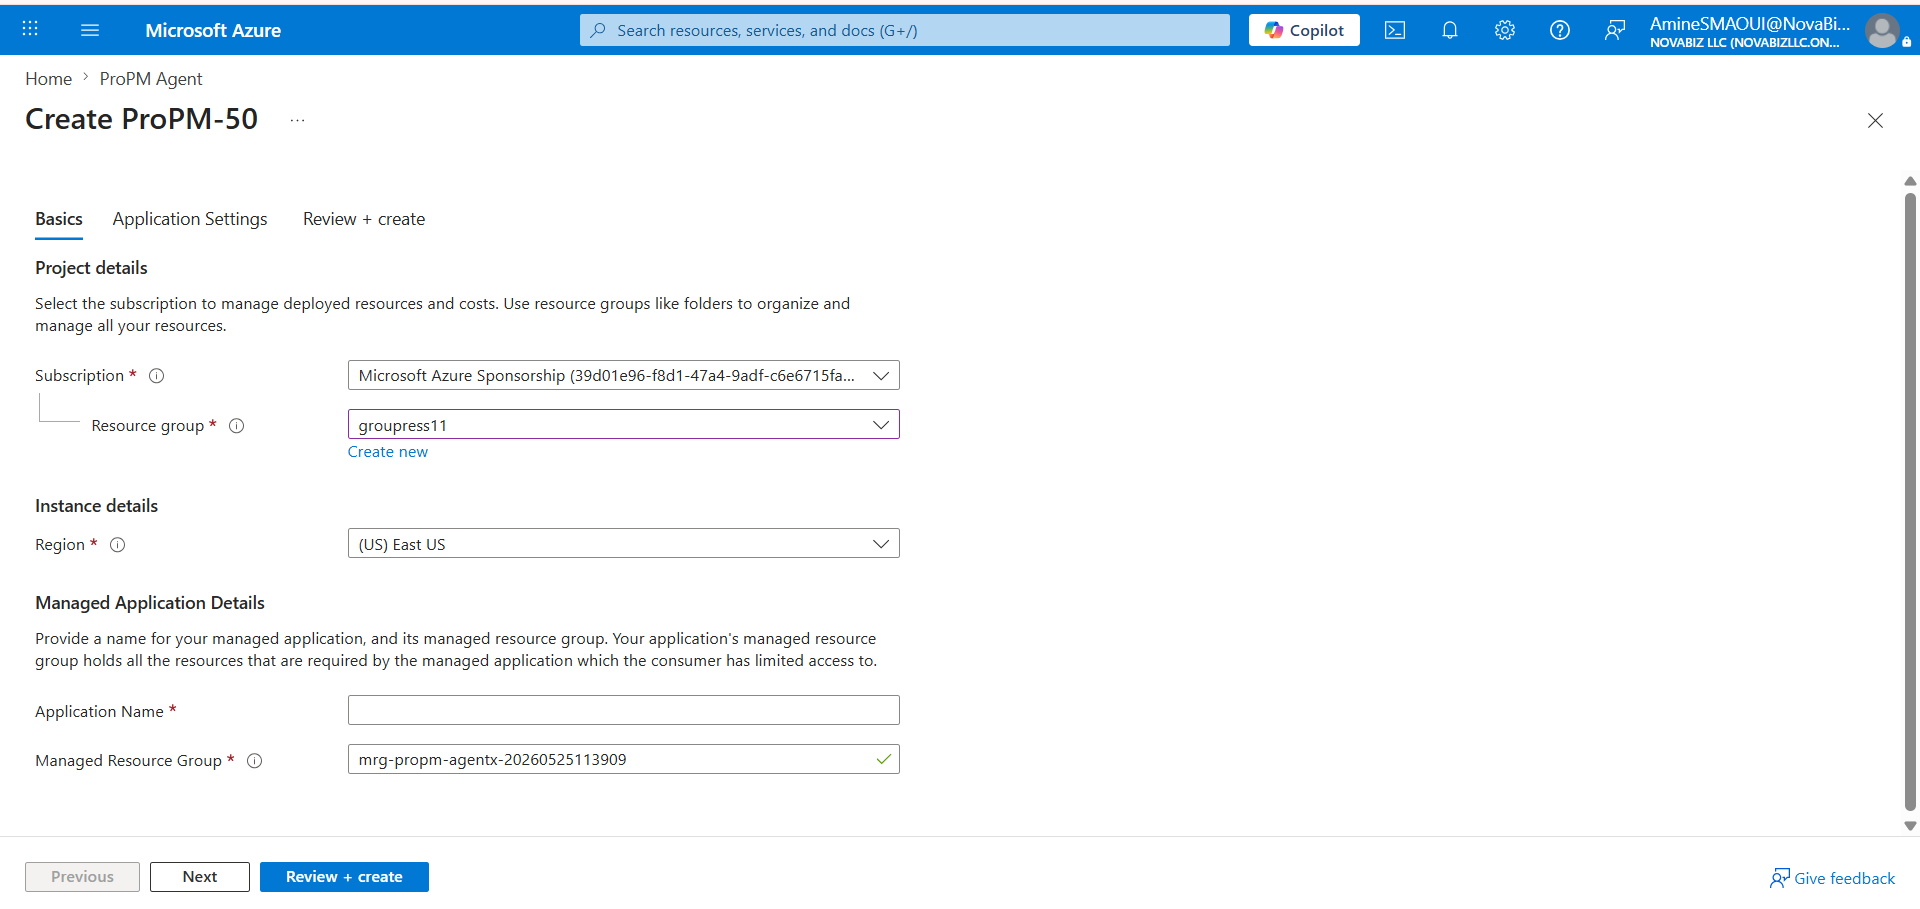
Basics Fields
| Field | Required | What to enter | Impact and recommendations |
|---|---|---|---|
| Subscription | Yes | The Azure subscription that receives the managed application and Marketplace billing. | Use a subscription where you have permission to deploy a Managed Application and create or select resource groups. Also verify internal cost and governance rules. |
| Resource group | Yes | The customer-side resource group that contains the Managed Application object. | Select an existing group or use Create new. This is not the internal managed resource group that contains the technical ProPM Agent resources. |
| Create new | No | Azure action to create a new resource group when no suitable group exists. | Use a clear name related to the environment and region. Avoid temporary names for production instances. |
| Region | Yes | The primary Azure deployment region. | Choose a region approved by your organization, close to users, and compatible with data residency requirements. Keep it consistent with planned network and AI resources. |
| Application Name | Yes | The visible name of the ProPM Agent Managed Application instance. | Use a stable, readable name such as propm-prod-eus. This name helps identify the instance in Azure. Do not include secrets or sensitive customer data. |
| Managed Resource Group | Yes | The managed resource group that receives internal resources deployed by the application. | Azure often proposes a generated name. Keep it unique and recognizable. This group is managed by the application; direct access can be limited by the Managed Application model. |
| Previous | No | Returns to the previous form step. | This button does not start a deployment. |
| Next | No | Moves to the next tab when required fields are filled well enough. | Use it to continue to Application Settings. If Azure blocks progress, review required fields marked with *. |
| Review + create | No | Runs final Azure validation before creation. | Use it only after completing application settings. Azure then shows errors or warnings that must be fixed before real creation starts. |
Screen 2 - Application Settings
The Application Settings tab configures the ProPM Agent environment itself: administration identity, installation mode, initial AI provider, CORS, monitoring, logging, initial password, and network.
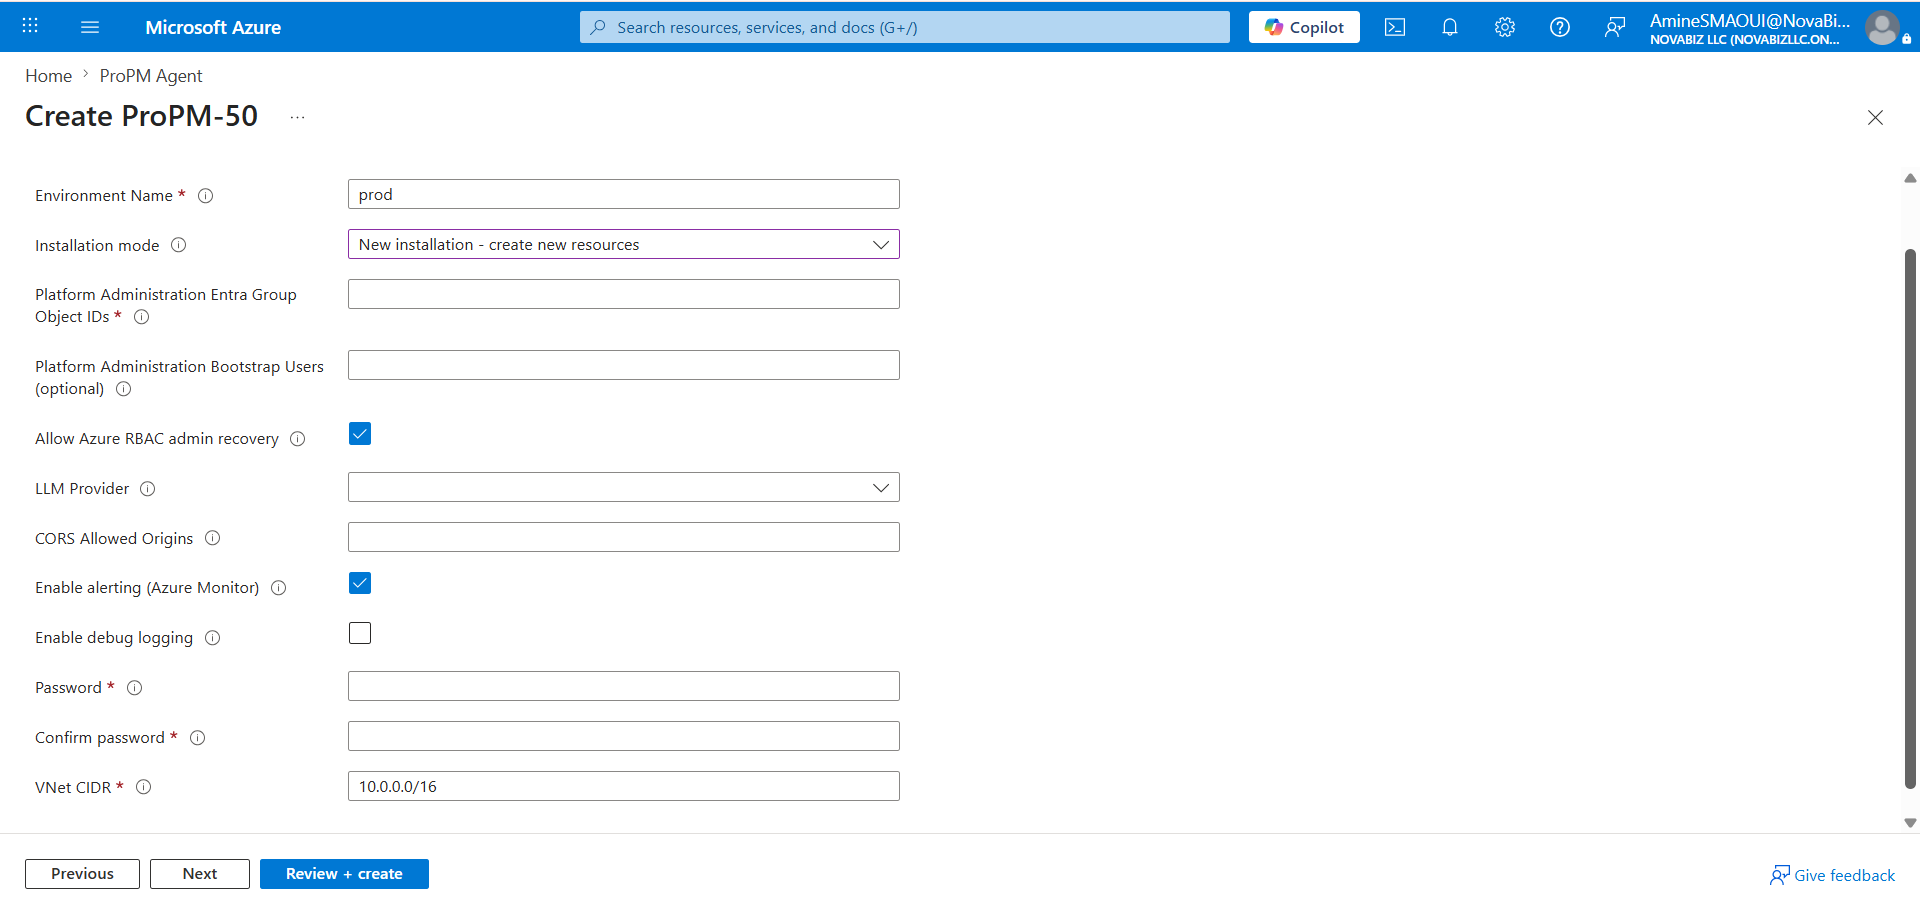
Application Settings Fields
| Field | Required | What to enter | Impact and recommendations |
|---|---|---|---|
| Environment Name | Yes | A short environment name, such as dev, test, uat, or prod. | This helps identify the environment in resources, configuration, and support exchanges. Use a short, stable, non-secret value that follows your internal convention. |
| Installation mode | Depends on scenario | The installation mode. For a first installation, keep New installation - create new resources. | This creates a new instance with new resources. Use an attach-existing-resources mode only for a plan change, major update, or recovery scenario that has been explicitly prepared. |
| Platform Administration Entra Group Object IDs | Yes | Object IDs of the Entra groups authorized to administer the platform. | Enter the group Object IDs, not only display names. These groups determine who can access Platform Administration after deployment. Prefer dedicated groups over broad groups. |
| Platform Administration Bootstrap Users (optional) | No | Bootstrap or recovery users, if your procedure requires them. | Use this to secure first access when Entra groups are not fully operational yet. Keep the list minimal and controlled. |
| Allow Azure RBAC admin recovery | No | Checkbox allowing administrator recovery through Azure RBAC. | Keep enabled if your operating model allows an authorized Azure administrator to recover platform access. Disable only if your governance requires strict, documented separation. |
| LLM Provider | Recommended | The initial AI provider family: Azure OpenAI, OpenAI, OpenRouter, or OpenAI-compatible depending on available choices. | This is an initial deployment intent. It does not prove the provider is operational yet. After installation, complete the provider in Platform Administration > AI Provider Settings with Save, Validate, Test, then Activate. |
| CORS Allowed Origins | Depends on scenario | Additional allowed web origins, for example https://portal.contoso.com. | Leave empty if no additional origin is required. Avoid broad wildcards. Values should be complete origins with https://, domain, and port when needed. |
| Enable alerting (Azure Monitor) | No | Enables or disables Azure Monitor alerts created for the environment. | Recommended for production so incidents can be detected. Afterwards, verify recipients, action rules, and cost rules in Azure Monitor. |
| Enable debug logging | No | Enables more detailed logs. | Keep disabled in production unless a support diagnosis requires it. Debug logging can increase log volume and expose more technical detail to authorized administrators. |
| Password | Yes | The initial password requested by the deployment form. | Generate a strong password and store it in an approved vault or secret manager. Do not send it by email, chat, or unsecured ticket. |
| Confirm password | Yes | The same value as Password. | Azure validates that both fields match. If validation fails, re-enter both values from the secure source. |
| VNet CIDR | Yes | The private network range reserved for the deployment, for example 10.0.0.0/16. | Choose a range that does not overlap with existing networks, peerings, VPNs, or planned future ranges. Have the network team validate this field before creation because it is difficult to change after deployment. |
| Previous | No | Returns to the Basics tab. | Use it to fix subscription, group, region, or names before final validation. |
| Next | No | Moves to the next form step. | Use it if you want to follow the tab order before validation. |
| Review + create | No | Runs final validation across all parameters. | Azure does not create resources until you confirm creation after validation. Fix every error before starting. |
Choosing LLM Provider
The LLM Provider field selects the AI family the environment should use first. It is not the end of AI configuration.
| Choice | Choose it when | Still required after installation |
|---|---|---|
| Azure OpenAI | The organization wants to stay in the Azure, Entra, and Microsoft governance ecosystem. | Confirm endpoint, region or available model, Azure OpenAI settings, tests, and activation. |
| OpenAI | The organization directly uses OpenAI APIs. | Enter URL, model, key or secret reference, then run Save, Validate, Test, Activate. |
| OpenRouter | The organization wants access to multiple models through one entry point. | Enter Base URL, key or secret reference, default model, then validate and activate. |
| OpenAI-compatible | The organization uses an OpenAI-compatible gateway or endpoint. | Enter exact endpoint, authentication mode, expected model or deployment, then test actual compatibility. |
Simple rule: deployment selects the AI provider; ProPM Agent administration makes it operational.
Validation Before Review + Create
Check these points before starting creation.
| Check | Expected result |
|---|---|
| Subscription and resource group | They match the target environment and governance rules |
| Region | It respects data residency, availability, and network strategy |
| Application Name | The name is clear, stable, and not confidential |
| Managed Resource Group | The name is unique and recognizable |
| Entra Group Object IDs | IDs are for the groups expected to administer the platform |
| Bootstrap Users | The list is empty or strictly limited to expected accounts |
| RBAC recovery | The choice aligns with the administrator recovery procedure |
| LLM Provider | The initial provider matches the AI strategy |
| CORS | Only required origins are allowed |
| Alerting | Enabled for environments that require monitoring |
| Debug logging | Disabled except during controlled diagnosis |
| Password | Stored in a vault and never shared in clear text |
| VNet CIDR | Validated by the network team and without known overlap |
After Deployment
- Wait for Azure provisioning to finish.
- Open the published ProPM Agent URL.
- Sign in with an account authorized by the Entra groups or bootstrap procedure.
- Verify access to Platform Administration.
- Open AI provider settings.
- Run Save, Validate, Test, then Activate for the selected provider.
- Verify licenses and the Marketplace plan.
- Run a first functional test with a standard user.
- Check AI Log after a run to confirm the provider actually used.
Common Blockers
| Symptom | Likely cause | Recommended action |
|---|---|---|
| Azure refuses to move to the next step | Required field is empty or invalid | Review every field marked * and the messages shown under fields |
| Administrator cannot see Platform Administration | Wrong Entra Object ID or group membership not propagated | Verify the group Object ID and the account membership |
| Network conflict during validation | VNet CIDR already used or overlapping | Choose another range with the network team |
| AI provider is not usable after creation | Deployment only selected the AI provider family | Complete the provider in administration with Save, Validate, Test, Activate |
| Too many logs or unexpected costs | Debug logging or alerting enabled without governance | Adjust Azure Monitor settings and disable debug outside diagnosis |
Next
- To finalize Entra access, open Azure and Entra administration.
- To configure the AI provider, open AI provider.
- To verify licenses, plans, and updates, open Licenses, plans and updates.
- To invite users, send Getting started.